<?xml version="1.0" encoding="utf-8"?>
<feed xmlns="http://www.w3.org/2005/Atom">

  <title><![CDATA[Development Journal]]></title>
  <link href="http://PHJ45.github.io/atom.xml" rel="self"/>
  <link href="http://PHJ45.github.io/"/>
  <updated>2013-12-13T15:24:03-05:00</updated>
  <id>http://PHJ45.github.io/</id>
  <author>
    <name><![CDATA[]]></name>
    
  </author>
  <generator uri="http://octopress.org/">Octopress</generator>

  
  <entry>
    <title type="html"><![CDATA[Svbtleness]]></title>
    <link href="http://PHJ45.github.io/blog/2013/11/20/svbtleness/"/>
    <updated>2013-11-20T15:07:00-05:00</updated>
    <id>http://PHJ45.github.io/blog/2013/11/20/svbtleness</id>
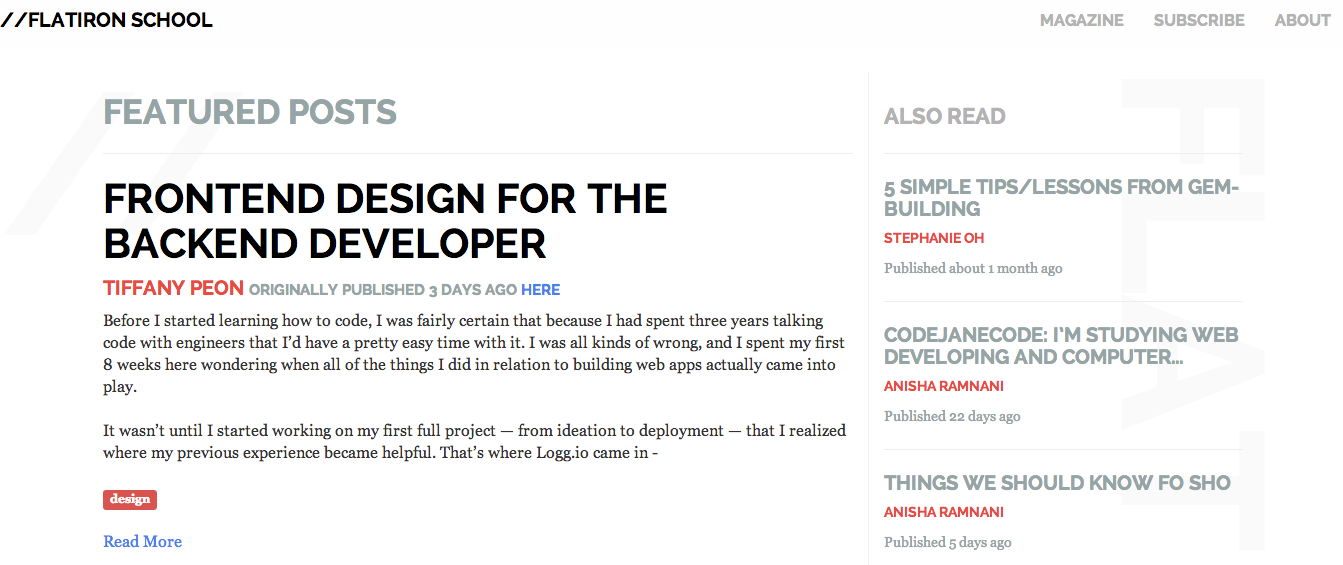
    <content type="html"><![CDATA[<p>Recently, I wrote a &ldquo;FeedBurner&rdquo; type application to allow admins to aggregate blogs and publish and tweet selected posts. You can see <a href="http://magazine.flatironschool.com/">the Flatiron Magazine</a> here.</p>

<p>While putting some polish on the CSS and information architecture, I took a style hint from a favorite publication of mine, &ldquo;Svbtle&rdquo;. That hint was the inclusion of &ldquo;watermarks&rdquo;</p>

<h4>WaterMarks</h4>

<p>The point of a water mark is to provide a static background element that provides a
a texture and depth to a document. Although subtle, it is an elegant way to make your work standout.</p>

<p><img src="http://phj45.github.io/images/magazine.png" title="magazine.png" alt="Magazine" /></p>

<h3>3 Parts</h3>

<p>Producing the watermark effect that is currently on trend takes four lines of code at
it&rsquo;s most basic form. The rest are personal touches you can affect, as you want.</p>

<h5>Z-index: -1;</h5>

<p>The Z-index property of CSS refers to where a DOM element is stacked on the document in a 3-D representation of the DOM. It tells us how far or near the element is to the user. This is <a href="http://coding.smashingmagazine.com/2009/09/15/the-z-index%0A-css-property-a-comprehensive-look/">a great full explanation of the z-index </a> but for now, just remember that the element
that you want to watermark needs to have the lowest z-index of any element on your page. That way all the other elements are stacked above them and the watermark won&rsquo;t interfere with the rest of your layout.</p>

<h5>Position: fixed;</h5>

<p>The point of a watermark is to provide a static background element that provides texture and depth to a document. By fixing the element’s position, it will become most visible when the user scrolls the document and provide a nice surprise as the user’s eye focuses on it. You can toy with relative or fixed but I suggest fixed for any type of text consumption site.</p>

<h5>Color: #fafafa;</h5>

<p>A watermark should be subtle and not obvious to every user when they first get to the site. If 15% of  your users don&rsquo;t even notice it,  you have done a good job. Always pick a shade for the font that visible from an angle but may be overlooked when a user peers straight on. For light color backgrounds use shades just slightly darker like the grey white combo I used. Use light colors against darker backgrounds.</p>

<p>Experiment and you will find the right fit.<a href="https://kuler.adobe.com/create/color-wheel">Here is my favorite site to pick colors from.</a></p>

<h5>The code for the vertical &ldquo;Flatiron&rdquo;</h5>

<figure class='code'><div class="highlight"><table><tr><td class="gutter"><pre class="line-numbers"><span class='line-number'>1</span>
<span class='line-number'>2</span>
<span class='line-number'>3</span>
<span class='line-number'>4</span>
<span class='line-number'>5</span>
<span class='line-number'>6</span>
<span class='line-number'>7</span>
<span class='line-number'>8</span>
<span class='line-number'>9</span>
<span class='line-number'>10</span>
<span class='line-number'>11</span>
<span class='line-number'>12</span>
<span class='line-number'>13</span>
<span class='line-number'>14</span>
<span class='line-number'>15</span>
<span class='line-number'>16</span>
</pre></td><td class='code'><pre><code class=''><span class='line'>h1#large_side {
</span><span class='line'>  position: fixed;
</span><span class='line'>  top: 7%;
</span><span class='line'>  left: 95%; 
</span><span class='line'>  font-size: 200px;
</span><span class='line'>  line-height: 200px;
</span><span class='line'>  font-weight: 900;
</span><span class='line'>  letter-spacing: -1px;
</span><span class='line'>  color: #fafafa;
</span><span class='line'>  z-index: -1;
</span><span class='line'>  -webkit-transform: rotate(90deg);
</span><span class='line'>  -moz-transform: rotate(90deg);
</span><span class='line'>  -o-transform: rotate(90deg);
</span><span class='line'>  -webkit-transform-origin: top left;
</span><span class='line'>  -moz-transform-origin: top left;
</span><span class='line'>  -o-transform-origin: top left;</span></code></pre></td></tr></table></div></figure>


<p>Enjoy, and remember to polish the front-end when you work. Even just good HTML text hierarchy can do wonders to attract attention from a user.</p>

<h5>Links</h5>

<ul>
<li><a href="http://magazine.flatironschool.com/">The Flatiron Magazine</a></li>
<li><a href="https://kuler.adobe.com/create/color-wheel">Kuler Color Wheel</a></li>
<li><a href="http://coding.smashingmagazine.com/2009/09/15/the-z-index-css-property-a-comprehensive-look/">Explnation of the Z-index </a></li>
</ul>

]]></content>
  </entry>
  
  <entry>
    <title type="html"><![CDATA[Packages for Sublime]]></title>
    <link href="http://PHJ45.github.io/blog/2013/10/27/packages-for-sublime/"/>
    <updated>2013-10-27T16:06:00-04:00</updated>
    <id>http://PHJ45.github.io/blog/2013/10/27/packages-for-sublime</id>
    <content type="html"><![CDATA[<h3>Package Control</h3>

<p>Packages in Sublime come in a variety of value and quality. Lets go over installing a side bar option enhancement pckage.</p>

<h4>Installation</h4>

<p>Package Control is a <a href="http://www.webopedia.com/TERM/S/software_package.html">package manager</a> that helps you extend and modify the Sublime editor. Lets get it installed, add a new package, and remove a package to get familiar with Package Control for Sublime.</p>

<ol>
<li><p>Install Package Control &ndash; <a href="https://sublime.wbond.net/installation">Get Package Control Here</a></p></li>
<li><p>Once here just copy and paste the correct Python code depending on which version of Sublime you have. Below is the code for Sublime Text 2.</p></li>
</ol>


<figure class='code'><figcaption><span></span></figcaption><div class="highlight"><table><tr><td class="gutter"><pre class="line-numbers"><span class='line-number'>1</span>
</pre></td><td class='code'><pre><code class='python'><span class='line'><span class="kn">import</span> <span class="nn">urllib2</span><span class="o">,</span><span class="nn">os</span><span class="p">;</span> <span class="n">pf</span><span class="o">=</span><span class="s">&#39;Package Control.sublime-package&#39;</span><span class="p">;</span> <span class="n">ipp</span> <span class="o">=</span> <span class="n">sublime</span><span class="o">.</span><span class="n">installed_packages_path</span><span class="p">();</span> <span class="n">os</span><span class="o">.</span><span class="n">makedirs</span><span class="p">(</span> <span class="n">ipp</span> <span class="p">)</span> <span class="k">if</span> <span class="ow">not</span> <span class="n">os</span><span class="o">.</span><span class="n">path</span><span class="o">.</span><span class="n">exists</span><span class="p">(</span><span class="n">ipp</span><span class="p">)</span> <span class="k">else</span> <span class="bp">None</span><span class="p">;</span> <span class="n">urllib2</span><span class="o">.</span><span class="n">install_opener</span><span class="p">(</span> <span class="n">urllib2</span><span class="o">.</span><span class="n">build_opener</span><span class="p">(</span> <span class="n">urllib2</span><span class="o">.</span><span class="n">ProxyHandler</span><span class="p">(</span> <span class="p">)));</span> <span class="nb">open</span><span class="p">(</span> <span class="n">os</span><span class="o">.</span><span class="n">path</span><span class="o">.</span><span class="n">join</span><span class="p">(</span> <span class="n">ipp</span><span class="p">,</span> <span class="n">pf</span><span class="p">),</span> <span class="s">&#39;wb&#39;</span> <span class="p">)</span><span class="o">.</span><span class="n">write</span><span class="p">(</span> <span class="n">urllib2</span><span class="o">.</span><span class="n">urlopen</span><span class="p">(</span> <span class="s">&#39;http://sublime.wbond.net/&#39;</span> <span class="o">+</span><span class="n">pf</span><span class="o">.</span><span class="n">replace</span><span class="p">(</span> <span class="s">&#39; &#39;</span><span class="p">,</span><span class="s">&#39;%20&#39;</span> <span class="p">))</span><span class="o">.</span><span class="n">read</span><span class="p">());</span> <span class="k">print</span><span class="p">(</span> <span class="s">&#39;Please restart Sublime Text to finish installation&#39;</span><span class="p">)</span>
</span></code></pre></td></tr></table></div></figure>


<p>Open Sublime and pop open the Sublime console by pressing <code>crl + `</code>.</p>

<p>Paste the code snippet into the console, press return, and restart your editor.</p>

<h4>Channels and Package Installation.</h4>

<p>Sublime Packages generally are found in the “Default Channel”. This is channel is the open source forum where developers add their packages and they can be easily searched and downloaded.</p>

<p>The option to create custom channels exists but we won’t touch on that here.</p>

<p>Package Control is evoked through the command palate.</p>

<ol>
<li><p>Open the Command Palate:   <code>cmd + shift + p</code> will pop open the command palate.</p></li>
<li><p>Type <code>Install</code> into the text area and you will see that package install option will be available.</p></li>
<li><p>Select the option <code>Package Control: Install Package</code></p></li>
<li><p>You will now be able to search by Package name. Even if you don’t know if a package exists that you are looking for. Just type in a few terms and see what comes up.</p></li>
<li><p>We are going to install a package called <code>SideBarEnhnacements</code>. This extension will give us some extra options when we are working on applications that have a robust directory structure.</p></li>
</ol>


<p>A concrete example would be that we wouldn’t need to switch to the terminal to type out <code>mkdir</code> when we need a new folder.</p>

<ol>
<li><p>Restart your editor after you hit return on <code>SideBarEnhnacements</code>.</p></li>
<li><p>Open any application you are working on and <code>ctrl click</code> on the side bar. You will see the enhanced options that  the <code>SideBarEnhnacements</code>package we just installed now gave us.</p></li>
</ol>


<h4>Remove a package</h4>

<ol>
<li>If for any reason you want to remove a package. Just open the Command Palate again with <code>cmd + shift + p</code> but now type <code>remove</code> and then select <code>Package Control: Remove Package</code> This will allow you to select for your package library what you would like to remove.</li>
</ol>


<h4>Editing Packages</h4>

<p>Many packages such as Gist require some sort of configuration. If so, you can browse your packages by selecting <code>browse packages</code> from the Sublime Text preferences dropdown.</p>

<p>There are ton of usefull packages out there and a solid community of people that are interested in pushing the Sublime development tool forward.</p>

<p>Check out the links below for a few that I am currently using and also a search on the Package Control site for all Ruby related packages.</p>

<h4>My Packages</h4>

<p><a href="https://sublime.wbond.net/search/ruby">Ruby Packages Search</a> Ruby Package Search.</p>

<p><a href="https://github.com/titoBouzout/SideBarEnhancements">SideBarEnhancements</a> The one we installed.</p>

<p><a href="https://github.com/mrmartineau/HTML5">HTML5</a> HTML5 Snippit library.</p>

<p><a href="https://github.com/condemil/Gist">Gist</a> Create github gists from highlighted texts.</p>

<p><a href="https://github.com/jisaacks/GitGutter">GitGutter</a> See the git status of each line of code.</p>
]]></content>
  </entry>
  
  <entry>
    <title type="html"><![CDATA[Modules and Method Encapsulation]]></title>
    <link href="http://PHJ45.github.io/blog/2013/10/15/week-4/"/>
    <updated>2013-10-15T10:14:00-04:00</updated>
    <id>http://PHJ45.github.io/blog/2013/10/15/week-4</id>
    <content type="html"><![CDATA[<p>Week four at the Flatiron School began with a Columbus Day catch up session on Monday. We did not have lectures but campus was open for us to work on older assignments.</p>

<p>My group – Team High Five – spent the day putting together a picture matching game as a way to practice working with the <code>Nokogiri</code> gem as well as <code>ERB</code> files and <code>HTML</code> template generation.</p>

<p>Yesterday, we had our first look at <code>Modules</code> during lecture.  Modules are a Ruby construct that allows us the ability to share features and method sets between objects. Unlike classes, which only allow for singe inheritance in Ruby,<code>modules</code> can be required as need.   Interestingly enough, <code>classes</code> actually inherit from <code>modules</code>. Per my command line just a moment ago:</p>

<figure class='code'><figcaption><span></span></figcaption><div class="highlight"><table><tr><td class="gutter"><pre class="line-numbers"><span class='line-number'>1</span>
<span class='line-number'>2</span>
<span class='line-number'>3</span>
</pre></td><td class='code'><pre><code class='ruby'><span class='line'><span class="n">ruby</span> <span class="o">-</span><span class="n">v</span> <span class="o">-</span><span class="n">e</span> <span class="s2">&quot;p Class.ancestors&quot;</span>
</span><span class='line'><span class="n">ruby</span> <span class="mi">2</span><span class="o">.</span><span class="mi">0</span><span class="o">.</span><span class="mi">0</span><span class="n">p247</span> <span class="p">(</span><span class="mi">2013</span><span class="o">-</span><span class="mo">06</span><span class="o">-</span><span class="mi">27</span> <span class="n">revision</span> <span class="mi">41674</span><span class="p">)</span> <span class="o">[</span><span class="n">x86_64</span><span class="o">-</span><span class="n">darwin12</span><span class="o">.</span><span class="mi">3</span><span class="o">.</span><span class="mi">0</span><span class="o">]</span>
</span><span class='line'><span class="o">[</span><span class="no">Class</span><span class="p">,</span> <span class="no">Module</span><span class="p">,</span> <span class="no">Object</span><span class="p">,</span> <span class="no">Kernel</span><span class="p">,</span> <span class="no">BasicObject</span><span class="o">]</span>
</span></code></pre></td></tr></table></div></figure>


<p>Up until this point at Flatiron, we have been including methods within the body of our classes that we have had to repeat again and again. Modules help us to avoid this an allows us to share methods between multiple classes.</p>

<h3>when to use which</h3>

<p>Since the construct <code>class</code> describes an object and a <code>module</code> describes abilities, the first rule of thumb we can use is that if we find ourselves building classes that never are used to create an instance of that class, then we should be using a <code>module</code>. Another use case for a <code>module</code> is when we have built a method set we know many classes are going to need. We can encapsulate these behaviors in a <code>module</code>.  I like to think of modules as <code>gems</code> for our classes.  Let’s take a look at some code from last week.</p>

<figure class='code'><figcaption><span></span></figcaption><div class="highlight"><table><tr><td class="gutter"><pre class="line-numbers"><span class='line-number'>1</span>
<span class='line-number'>2</span>
<span class='line-number'>3</span>
<span class='line-number'>4</span>
<span class='line-number'>5</span>
<span class='line-number'>6</span>
<span class='line-number'>7</span>
<span class='line-number'>8</span>
<span class='line-number'>9</span>
</pre></td><td class='code'><pre><code class='ruby'><span class='line'><span class="k">class</span> <span class="nc">Student</span>
</span><span class='line'>  <span class="k">def</span> <span class="nc">self</span><span class="o">.</span><span class="nf">find_by_name</span><span class="p">(</span><span class="nb">name</span><span class="p">)</span>
</span><span class='line'>    <span class="vc">@@all</span><span class="o">.</span><span class="n">select</span> <span class="p">{</span> <span class="o">|</span><span class="n">s</span><span class="o">|</span> <span class="n">s</span><span class="o">.</span><span class="n">name</span> <span class="o">==</span> <span class="nb">name</span> <span class="p">}</span>
</span><span class='line'>  <span class="k">end</span>
</span><span class='line'>
</span><span class='line'>  <span class="k">def</span> <span class="nc">self</span><span class="o">.</span><span class="nf">find</span><span class="p">(</span><span class="nb">id</span><span class="p">)</span>
</span><span class='line'>    <span class="vc">@@all</span><span class="o">.</span><span class="n">select</span> <span class="p">{</span> <span class="o">|</span><span class="n">s</span><span class="o">|</span> <span class="n">s</span><span class="o">.</span><span class="n">id</span> <span class="o">==</span> <span class="nb">id</span> <span class="p">}</span><span class="o">.</span><span class="n">first</span>
</span><span class='line'>  <span class="k">end</span>
</span><span class='line'><span class="k">end</span>
</span></code></pre></td></tr></table></div></figure>


<p>The code above represents two methods of a 70-line Student class.  We had been using a class level variable <code>all</code> to store every instance of the Student class. As our domain would be expanding throughout the assignment, this same functionality would be desired for many objects in the domain such as <code>Teachers</code> or <code>Lectures</code>.  Since I want to share these methods among many classes but don&rsquo;t want to build a rigid inheritance chain, I can create a <code>module</code> called <code>findable</code> and mix it into my classes as needed.</p>

<figure class='code'><figcaption><span></span></figcaption><div class="highlight"><table><tr><td class="gutter"><pre class="line-numbers"><span class='line-number'>1</span>
<span class='line-number'>2</span>
<span class='line-number'>3</span>
<span class='line-number'>4</span>
<span class='line-number'>5</span>
<span class='line-number'>6</span>
<span class='line-number'>7</span>
<span class='line-number'>8</span>
<span class='line-number'>9</span>
</pre></td><td class='code'><pre><code class='ruby'><span class='line'><span class="k">module</span> <span class="nn">Findable</span>
</span><span class='line'>  <span class="k">def</span> <span class="nf">find_by_name</span><span class="p">(</span><span class="nb">name</span><span class="p">)</span>
</span><span class='line'>    <span class="vc">@@all</span><span class="o">.</span><span class="n">select</span> <span class="p">{</span> <span class="o">|</span><span class="n">s</span><span class="o">|</span> <span class="n">s</span><span class="o">.</span><span class="n">name</span> <span class="o">==</span> <span class="nb">name</span> <span class="p">}</span>
</span><span class='line'>  <span class="k">end</span>
</span><span class='line'>
</span><span class='line'>  <span class="k">def</span> <span class="nf">find</span><span class="p">(</span><span class="nb">id</span><span class="p">)</span>
</span><span class='line'>    <span class="vc">@@all</span><span class="o">.</span><span class="n">select</span> <span class="p">{</span> <span class="o">|</span><span class="n">s</span><span class="o">|</span> <span class="n">s</span><span class="o">.</span><span class="n">id</span> <span class="o">==</span> <span class="nb">id</span> <span class="p">}</span><span class="o">.</span><span class="n">first</span>
</span><span class='line'>  <span class="k">end</span>
</span><span class='line'><span class="k">end</span>
</span></code></pre></td></tr></table></div></figure>


<p>Now as my school domain project grows, I can just include the <code>Module Findable</code> .</p>

<figure class='code'><figcaption><span></span></figcaption><div class="highlight"><table><tr><td class="gutter"><pre class="line-numbers"><span class='line-number'>1</span>
<span class='line-number'>2</span>
<span class='line-number'>3</span>
</pre></td><td class='code'><pre><code class='ruby'><span class='line'><span class="k">class</span> <span class="nc">Teachers</span>
</span><span class='line'><span class="kp">include</span> <span class="no">Findable</span>
</span><span class='line'><span class="k">end</span>
</span></code></pre></td></tr></table></div></figure>


<p>Going forward, the use of <code>modules</code> will help us keep our inheritance structure succinct and extendable.</p>
]]></content>
  </entry>
  
  <entry>
    <title type="html"><![CDATA[The Ternary Operator]]></title>
    <link href="http://PHJ45.github.io/blog/2013/10/14/the-ternary-operator/"/>
    <updated>2013-10-14T22:04:00-04:00</updated>
    <id>http://PHJ45.github.io/blog/2013/10/14/the-ternary-operator</id>
    <content type="html"><![CDATA[<p>In this post, I wanted to take a look at a conditional that I have used many times as a beginner but as our class has moved into object oriented programming, the use cases have narrowed.</p>

<p>The ternary operator is a conditional that will return one value if the condition is true and another value if it is false.  It is a common computer science operator in many languages and afforded to us Rubiest as well.</p>

<p>The ternary allows us programmers to inject a binary conditional into our code in a single line and can be a handy way to keep methods small and effective by avoiding &lsquo;if/else&rsquo; blocks.</p>

<h3>Some Latin</h3>

<p>The term &ldquo;ternary&rdquo; is derived from the Latin term &ldquo;termarius&rdquo;. It is an adjective that means, “composed of three items”.  In reference to the Ruby ternary operator, the three parts are the “Conditional” and the “True Return” and the “False Return”.</p>

<p>The format of the operator looks like this:</p>

<figure class='code'><figcaption><span></span></figcaption><div class="highlight"><table><tr><td class="gutter"><pre class="line-numbers"><span class='line-number'>1</span>
</pre></td><td class='code'><pre><code class='ruby'><span class='line'><span class="no">Condition</span> <span class="p">?</span> <span class="no">Return</span> <span class="k">if</span> <span class="kp">true</span> <span class="p">:</span> <span class="no">Return</span> <span class="k">if</span> <span class="kp">false</span>
</span></code></pre></td></tr></table></div></figure>


<p>As you may have noticed, the logical decision tree behind the operator is the same as a general “if/else” statement. Because of this, it is true that the ternary operator is not generally needed but it is nice to know about it.</p>

<p>Here is a code example from earlier in our semester.</p>

<p>We had been asked to create a method that returned true if an object of the person class had an age value that was between 13-19.</p>

<figure class='code'><figcaption><span></span></figcaption><div class="highlight"><table><tr><td class="gutter"><pre class="line-numbers"><span class='line-number'>1</span>
<span class='line-number'>2</span>
<span class='line-number'>3</span>
<span class='line-number'>4</span>
<span class='line-number'>5</span>
<span class='line-number'>6</span>
<span class='line-number'>7</span>
<span class='line-number'>8</span>
<span class='line-number'>9</span>
<span class='line-number'>10</span>
<span class='line-number'>11</span>
<span class='line-number'>12</span>
</pre></td><td class='code'><pre><code class='ruby'><span class='line'><span class="k">class</span> <span class="nc">Person</span>
</span><span class='line'>  <span class="kp">attr_accessor</span> <span class="ss">:age</span>
</span><span class='line'>
</span><span class='line'>  <span class="k">def</span> <span class="nf">initialize</span><span class="p">(</span><span class="n">age</span><span class="p">)</span>
</span><span class='line'>    <span class="vi">@age</span> <span class="o">=</span> <span class="n">age</span>
</span><span class='line'>  <span class="k">end</span>
</span><span class='line'>
</span><span class='line'>  <span class="k">def</span> <span class="nf">is_a_teenager?</span>
</span><span class='line'>    <span class="n">age</span><span class="o">.</span><span class="n">between?</span><span class="p">(</span><span class="mi">13</span><span class="p">,</span><span class="mi">19</span><span class="p">)</span> <span class="p">?</span> <span class="kp">true</span> <span class="p">:</span> <span class="kp">false</span>
</span><span class='line'>  <span class="k">end</span>
</span><span class='line'>
</span><span class='line'><span class="k">end</span>
</span></code></pre></td></tr></table></div></figure>


<p>This method could also have easily been coded as an <code>if/else</code> statement.</p>

<figure class='code'><figcaption><span></span></figcaption><div class="highlight"><table><tr><td class="gutter"><pre class="line-numbers"><span class='line-number'>1</span>
<span class='line-number'>2</span>
<span class='line-number'>3</span>
<span class='line-number'>4</span>
<span class='line-number'>5</span>
<span class='line-number'>6</span>
<span class='line-number'>7</span>
</pre></td><td class='code'><pre><code class='ruby'><span class='line'><span class="k">def</span> <span class="nf">teen</span><span class="p">(</span><span class="n">age</span><span class="p">)</span>
</span><span class='line'>  <span class="k">if</span> <span class="n">age</span><span class="o">.</span><span class="n">between?</span><span class="p">(</span><span class="mi">13</span><span class="p">,</span><span class="mi">19</span><span class="p">)</span>
</span><span class='line'>    <span class="kp">true</span>
</span><span class='line'>  <span class="k">else</span>
</span><span class='line'>    <span class="kp">false</span>
</span><span class='line'>  <span class="k">end</span>
</span><span class='line'><span class="k">end</span>
</span></code></pre></td></tr></table></div></figure>


<p>So as a curious novice, I wanted to know if the ternary had a more potent use.</p>

<h3>variable assignment</h3>

<p>We can use the ternary operator to quickly select between two values for assigment. In this case, the return of the expression would be the assigned value.</p>

<figure class='code'><figcaption><span></span></figcaption><div class="highlight"><table><tr><td class="gutter"><pre class="line-numbers"><span class='line-number'>1</span>
</pre></td><td class='code'><pre><code class='ruby'><span class='line'><span class="n">variable</span> <span class="o">=</span> <span class="n">conditional</span> <span class="p">?</span> <span class="n">value_if_true</span>  <span class="p">:</span> <span class="n">value_if_false</span>
</span></code></pre></td></tr></table></div></figure>


<p>This is helpful so as doing this assigment in <code>if/else</code> block would be a bit more typing or we would need to employ a <code>case</code> statement.</p>
]]></content>
  </entry>
  
  <entry>
    <title type="html"><![CDATA[Keeping Sharp]]></title>
    <link href="http://PHJ45.github.io/blog/2013/10/14/keeping-sharp/"/>
    <updated>2013-10-14T10:47:00-04:00</updated>
    <id>http://PHJ45.github.io/blog/2013/10/14/keeping-sharp</id>
    <content type="html"><![CDATA[<p>As a novice programmer, I am constantly reminded of how I felt when training to play sports. To me, playing around with primitive objects such as arrays and strings is very much like playing wall ball in any sport. It is repetition of a core skill set.</p>

<h3>Sort</h3>

<p>Outside of the transformative enumerable methods such as <code>.select</code> and <code>.map</code>, arrays are responsive to a variety of methods that allow us to sort and manipulate them very quickly without passing the method a block.</p>

<p>As we add elements on top of an array&rsquo;s stack with the push method. The items are ordered based on the sequence in which we pushed them onto the stack.</p>

<figure class='code'><figcaption><span></span></figcaption><div class="highlight"><table><tr><td class="gutter"><pre class="line-numbers"><span class='line-number'>1</span>
<span class='line-number'>2</span>
<span class='line-number'>3</span>
</pre></td><td class='code'><pre><code class='ruby'><span class='line'><span class="n">array</span> <span class="o">=</span> <span class="o">[]</span>
</span><span class='line'><span class="n">array</span><span class="o">.</span><span class="n">push</span><span class="p">(</span><span class="mi">2</span><span class="p">,</span><span class="mi">6</span><span class="p">,</span><span class="mi">4</span><span class="p">,</span><span class="mi">3</span><span class="p">,</span><span class="mi">1</span><span class="p">,</span><span class="mi">5</span><span class="p">)</span>
</span><span class='line'><span class="n">array</span> <span class="o">=</span> <span class="o">[</span><span class="mi">2</span><span class="p">,</span><span class="mi">6</span><span class="p">,</span><span class="mi">4</span><span class="p">,</span><span class="mi">3</span><span class="p">,</span><span class="mi">1</span><span class="p">,</span><span class="mi">5</span><span class="o">]</span>
</span></code></pre></td></tr></table></div></figure>


<p>In order to get a sorted copy of the array returned to us, we simply would need to type.</p>

<figure class='code'><figcaption><span></span></figcaption><div class="highlight"><table><tr><td class="gutter"><pre class="line-numbers"><span class='line-number'>1</span>
</pre></td><td class='code'><pre><code class='ruby'><span class='line'><span class="n">array</span><span class="o">.</span><span class="n">sort</span> <span class="c1"># =&gt; [1, 2, 3, 4, 5, 6]</span>
</span></code></pre></td></tr></table></div></figure>


<p>but what if we wanted them sorted in a descending order. We can use a little method chaining here to produce the desired effect.</p>

<figure class='code'><figcaption><span></span></figcaption><div class="highlight"><table><tr><td class="gutter"><pre class="line-numbers"><span class='line-number'>1</span>
</pre></td><td class='code'><pre><code class='ruby'><span class='line'><span class="n">array</span><span class="o">.</span><span class="n">sort</span><span class="o">.</span><span class="n">reverse</span> <span class="c1"># =&gt; [6, 5, 4, 3, 2, 1]</span>
</span></code></pre></td></tr></table></div></figure>


<h3>chars</h3>

<p>Often times we are passed a string or array and we need to break it apart at a chosen delimiter.  The <code>.chars</code> method allows us to break apart a string into the individual characters. The return of this is an array of the individual characters.</p>

<figure class='code'><figcaption><span></span></figcaption><div class="highlight"><table><tr><td class="gutter"><pre class="line-numbers"><span class='line-number'>1</span>
<span class='line-number'>2</span>
</pre></td><td class='code'><pre><code class='ruby'><span class='line'><span class="nb">test</span> <span class="o">=</span> <span class="s2">&quot;hello how are you&quot;</span>
</span><span class='line'><span class="nb">test</span><span class="o">.</span><span class="n">chars</span> <span class="c1"># =&gt; [&quot;h&quot;, &quot;e&quot;, &quot;l&quot;, &quot;l&quot;, &quot;o&quot;,&quot; &quot;, &quot;h&quot;, &quot;o&quot;, &quot;w&quot;,&quot; &quot;, &quot;a&quot;, &quot;r&quot;, &quot;e&quot;,&quot; &quot;, &quot;y&quot;, &quot;o&quot;, &quot;u&quot;]</span>
</span></code></pre></td></tr></table></div></figure>


<h3>excluding characters</h3>

<p>Now that we have returned an array of each indiviudal character in the string, we may want to work with the new data but because we used the <code>.chars</code> method we also have <code>" "</code> character in our return array.</p>

<p><strong>subtraction</strong>:</p>

<p>We have several options here such as using a <code>.reject</code>  method call but I am going to touch on a simple way of doing this that I have used. We can subtract the characters we don&rsquo;t want from the array. This works for any character as well and does not modify the reciever.</p>

<figure class='code'><figcaption><span></span></figcaption><div class="highlight"><table><tr><td class="gutter"><pre class="line-numbers"><span class='line-number'>1</span>
</pre></td><td class='code'><pre><code class='ruby'><span class='line'><span class="n">chars</span> <span class="o">=</span> <span class="nb">test</span><span class="o">.</span><span class="n">chars</span> <span class="c1"># =&gt; [&quot;h&quot;, &quot;e&quot;, &quot;l&quot;, &quot;l&quot;, &quot;o&quot;,&quot; &quot;, &quot;h&quot;, &quot;o&quot;, &quot;w&quot;,&quot; &quot;, &quot;a&quot;, &quot;r&quot;, &quot;e&quot;,&quot; &quot;, &quot;y&quot;, &quot;o&quot;, &quot;u&quot;]</span>
</span></code></pre></td></tr></table></div></figure>


<figure class='code'><figcaption><span></span></figcaption><div class="highlight"><table><tr><td class="gutter"><pre class="line-numbers"><span class='line-number'>1</span>
</pre></td><td class='code'><pre><code class='ruby'><span class='line'><span class="n">chars</span> <span class="o">-</span> <span class="o">[</span><span class="s2">&quot; &quot;</span><span class="o">]</span> <span class="c1">#=&gt; [&quot;h&quot;, &quot;e&quot;, &quot;l&quot;, &quot;l&quot;, &quot;o&quot;, &quot;h&quot;, &quot;o&quot;, &quot;w&quot;, &quot;a&quot;, &quot;r&quot;, &quot;e&quot;, &quot;y&quot;, &quot;o&quot;, &quot;u&quot;]</span>
</span></code></pre></td></tr></table></div></figure>


<h3>practice</h3>

<p>There are many more basic work flows that I find myself repeating through out the semeester and it has helped me to be able to just run them quickly when I have some free time so that when presented with a task, it is second nature to move through a given work flow.</p>

<p>Next post I am going to go over a few simple ways to convert arrays into hashes with some concise and simple iterations.</p>
]]></content>
  </entry>
  
</feed>